Showing posts with label Left Fuel Tank. Show all posts

Wednesday, November 21, 2007

Left Fuel Tank Completed!


Here it is, all ready for final install on the wing! All that's left is the soap and water residue that will be cleaned off as soon as I have a chance to get some rubbing alcohol. Kids, getting these tanks put together has been a real challenge. So yes, I will display them like a new car on a showroom floor. Ha!

I chose to prime the rear baffle after the leak test.

Wednesday, November 14, 2007

Left Fuel Tank Leak Test OK!


After ordering the 5 dollar leak kit from Vans, I commenced with the test. First you cap off the fuel pick up, then connect balloons to the vents(I rigged up some tubing and zip ties to help get a tight fit around the balloons). Next, I placed a latex glove around the fuel cap and put it in place. Then I inserted the fitting, supplied by vans, into the quick drain and slowly pumped air into the tank until the balloons started to fill. I then disconnected the hand pump and started spraying a soap and water mixture over the tank. Finally, I did a careful inspection over the entire tank.
I am VERY HAPPY to report that I have found NO LEAKS! The balloons have held air through the night and continue to do so...... Update- After a week, the ballons were still inflated to the same size so I disconnected everything and moved on.


Tip: Place a latex glove over the fuel cap before testing. I've heard this helps provide a good tight seal. It worked for me..... (Vans recommends putting tape over the cap)

Sunday, November 11, 2007

Shimmed Leading Edge

I drilled out the inboard leading edge rivets and installed several small shims to eliminate the "pillowing"of the fuel tank. Here is a close up after the shims were installed. I think it turned out very well.

Nice and tight seam between the tank and leading edge.

Tuesday, November 06, 2007

Left Tank Fitted in Place!


Note- Go to Left Fuel Tank Label, on main page, for tank construction details.
Getting ready to rivet the first top main skin into place. The wing walk doubler is underneath the inboard skin edge. -Side note, the blue protective vinyl will soon be coming off the skins!

Tank Complete! I will test it for leaks in a week or so, after the proseal has had plenty of time to cure.

Here is a pic of the inboard fuel tank. I sealed the access plate and all of the fittings. Afterward, I touched up the scratches and bare areas with rattle can aviation primer.

Special Thanks!


Special Thanks to Udo, a friend from work, for lending me a helping hand. We spent at least seven hard hours working on the tanks in an effort to get these puppies knocked out. Udo, is an A&P with many years of aviation tech experience, including working the assembly line at Gulfstream.

Sealed Left Rear Baffle


First the rear baffle and rear rib flanges were cleaned with MEK. Then a bead of proseal was applied, in all of the appropriate places, and the baffle was dropped in place. Next the holes were clecoed up 100%. We then sealed and clecoed the Z brackets in place, followed by riveting.

Here you can see the tank Z brackets and rear baffle flanges riveted and sealed in place.

Thursday, November 01, 2007

Left Wing Fuel Level Sender and Float


Here I have adjusted and put the float/sender in place for a test fit. It is in the EMPTY position. There is exactly 1/8 of an inch gap, from the bottom, which is what Vans recommends. *Tip 1) The float can be flipped over to the opposite side of the wire holder, if needed(I did this to prevent the float from interfering with the stiffener flange). 2) Be sure to bend the very end of the wire 90 degrees,then snap it into the wire holders. This prevents the wire from possibly sliding out of the sender and most builders miss this step. This is not covered in Vans directions.

Here is the float in the FULL position. I finished the test by checking the resistance with a volt/ohm meter. All of this isn't to critical if you are planning on installing a modern EFIS EMS, which I plan on doing. They have you add two gals of fuel at a time, upon installation, and calculate everything so that it's exact everytime.

The Standard Fuel Pickup Installed


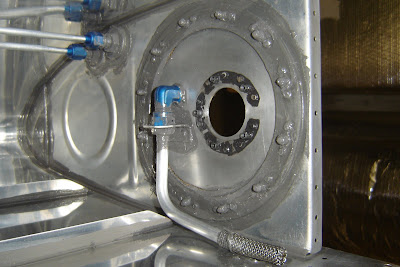
Here is the standard fuel pickup installed. You can see the anti-rotation bracket, riveted and prosealed, around the AN fitting. The wire mesh,on the bottom of the tube, is safety wired and prosealed. The small hole, in the access plate, will house the fuel level sender/float. More to come.....

Ran Plumbing in the Left Tank


Finally, supplies arrive to help me finish the tanks.
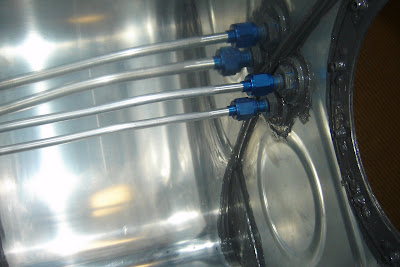
Here is a good shot of the vent line(long line across the top),vapor return line(short line across the top* Note- return line may not be required for your particular engine), and the standard fuel pick up(bottom right). I torqued all AN fittings to the correct settings. *Note-I'm using a single flop tube in the right tank for inverted flight, see right tank.

Here is a shot of the vent line at the outboard side of the left tank. I ran the line through a clip, attached to the fuel cap flange, and bent it upward to the tank high point. I hope this prevents fuel from dripping overboard during those hot summer days with full tanks...

Tuesday, October 16, 2007

Installed Fuel Vent and Vapor Return Line


Today I cut and flared the fuel vent and vapor return lines. Here they are in place for a test fit.
Disregard the reflection on the top inside of the tank. There are only two lines.

Friday, October 12, 2007

All of the Ribs are Sealed


Ahhhhhhhhhhh! All thats left is to install the plumbing,fuel level float, and seal the rear baffle.

OutBoard Rib Sealed


Sealed the Leading Edge Rib and Brackets


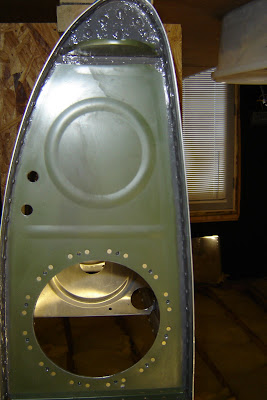
Inboard Leading Edge close up.


I riveted/sealed the leading edge rib, Then and only then can you put the reinforcement brackets in place and rivet/seal them.


Notice that I had to remove the AN fittings to be able to rivet the inboard rib.

Sealed Fuel Tank Ribs


My friend Udo came over today to help me seal the ribs. Here is a pic of him mixing up a batch of proseal. Use a 10:1 mix and weigh the "Black Death" on a scale to get it as accurate as possible. Thanks for all of the help Udo!

A sealed rib. You must make a fillet around the edges after the rivets have been set.

This stuff is crazy messy. I think I spent more time cleaning this goop up and off things than anything else.

Wednesday, October 10, 2007

Sealed the Outboard and Inboard Rib


I riveted and sealed the reinforcement plate at the outboard leading edge. I also sealed and riveted a AN470 AD6 rivet in the aft tooling hole.

*UPDATE- Ooooops! Don't seal the AN Fittings yet. I had to take them back off and re-clean everything as soon as I realized that I couldn't rivet the rib to the skin with them in place. Doh!
Inboard rib. I sealed the reinforcement ring and fuel vent/vapor return line AN fittings.

Sealed the Fuel Drain


Outside

Inside

Sealed the Fuel Cap Assembly


Outside

Inside. Notice the vent line clip on top?

Sealed the Stiffeners


I back riveted the stiffeners in place.

Saturday, August 18, 2007

Removed Vinyl, Dimpled Fuel Tank Skins, and Ribs


I use a soldering iron to remove the protective blue vinyl before dimpling.

Dimpling the skins with the DRDT-2. I used special FUEL TANK dimple dies for a better end result.

I then dimpled the fuel tank ribs.

Debur Fuel Tank Skins


I deburred the tank skins with a scotchbrite pad on the #40 holes and countersink bit on the larger ones. I will need to deep clean and scuff this area again before applying proseal.